Installing FreeNAS on Acer Aspire Easystore H340
Posted on Dec 09, 2009 by HappyBison
Introduction
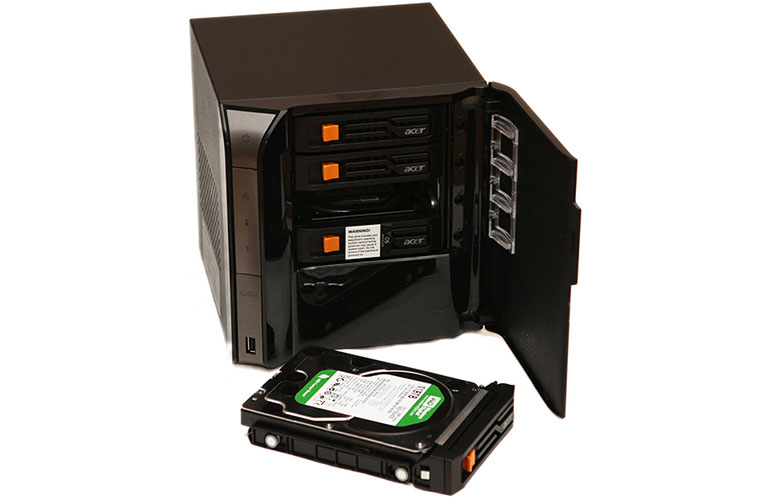
My Network storage exploration never ends. So I recently received an Acer Aspire EasyStore H340 unit to play around. It came with Windows Home Server from the factory, but my idea was to find out how easy to install a different OS (my goal was to have FreeNAS on it).
There are many reviews about this little box so I'll just briefly describe what it is and what it can do.

Hardware specifications:
- Series: Aspire Easystore H340
- Model: AH340-UA230N
- CPU: Intel Atom Processor 230 1.6Ghz
- Chipset: Intel 945GC Express Chipset + ICH7R
- Motherboard form-factor: Mini-ITX
- Internal Slot: PCI-express 4x
- Memory: 2GB (one 240-pin DDR2 PC2-6400 800MHz Module)
- Hard drive interface: SATA-II
- Hard drive bays: 4 Hot-swappable SATA 3.5"
- Installed drive: WD Green 1TB (I got WD10EADS in my unit installed)
- Network controller: Gigabit (10/100/1000) Marvell Yukon 88E8071
- 5 x USB2.0 ports (4 ports on the back, 1 port in the front)
- eSATA port on the back
- No Video out port (can be added with a special cable, more on that below)
- OS Installed: Microsoft Windows Home Server (WHS)
- Dimensions: 7.87" x 7.09" x 8.35"
- SMI 256MB USB Internal Flash drive SM321 (more on that below)
Why not WHS?
Some readers might ask "What's wrong with WHS? Why don't you want to keep it?". That's a good question.. I have several reasons:
- The way how WHS keep the data on the drives did not sound reliable to me. Selected data can be setup to be duplicated across multiple drives. I would rather to have a software RAID.
OS installed on one of the drives so you can't hot-swap all the drives. And if OS drive fails (and mechanical hard drive do fail after some time), then you are in troubles. Your data might be partially intact, but you have some good downtime when trying to reinstall OS on the server. Any modern USB Flash drive is much more reliable in this case.
- FreeNAS for my is easier to manage and it has some additional service which I use (rsync, Web server, torrent client, FTP, etc.).
Preparation
Video output
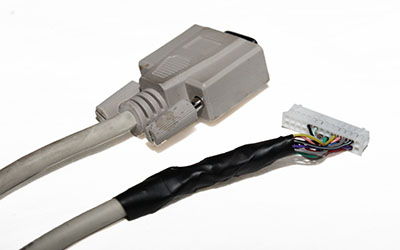
The Acer EasyStore H340 does not have VGA output so it can not be connected to the monitor. In order to get it connected to the monitor you can either get a PCI-express 1x/4x Video card or make or buy a special VGA cable so you can use the onboard video (GMA950) for it. If you decide to buy a video card, that's okay, but I found it to be too expensive and it was cheaper for me to build my own cable instead. I built my own and it took about half hour and about $10 for parts ordered online. I used the pinout provided on MediaSmartServer.net forum. You don't have to have a full cable set with PS/2 keyboard and mouse. You could get VGA output working and use any USB keyboard/mouse connected to the H340 USB ports.

Pinout table
Here is how I connected my VGA cable:
Signal |
Acer H340 |
VGA connector |
DDC Data |
9 |
12 |
DDC Clock |
11 |
15 |
Red |
14 |
1 |
Ground |
16 |
6 |
Ground |
17 |
5 |
Green |
18 |
2 |
Vertical Sync |
19 |
14 |
Ground |
20 |
7 |
Ground |
21 |
10 |
Blue |
22 |
3 |
Horizontal Sync |
23 |
13 |
Ground |
24 |
8 |
VGA +5V |
25 |
9 |
You can find the exact DigiKey part numbers listed at the bottom of this article so you can order it and build the cable.
OS Drive for FreeNAS
Originally I intended to get a USB Flash drive and install it internally using the front USB port. However, when I started to discover internals of Acer EasyStore H340, I found out that it has 256MB internal USB Flash drive on the board which can be used to boot into FreeNAS. It seems like this drive is used for recovery process when your WHS failed and that's what I'll be using to install and run FreeNAS from.
Steps to install FreeNAS on internal 256MB USB Flash drive:
- Enable Debug mode on Acer EasyStore H340 by putting a jumper JP3 on the motherboard
- Connect VGA cable to Debug 26-pin connector on the motherboard
Turn on the system to verify that it works and you can get to the BIOS Setup by pressing <F2> on the keyboard
Download FreeNAS image: FreeNAS "Embedded" 0.7 AMD64 (Intel Atom 230 supports 64-bit OS). You will get a file called something like FreeNAS-amd64-embedded-0.7.4919.img
- Install FreeNAS onto internal USB Flash drive. There are several ways how you can do it. Here is the way I've done it:
I created a bootable flash drive using one of my spare 1GB USB sticks. Then booted up using this newly created USB stick (press <F12> during system messages on Acer to get a boot selector screen), and used the following commands to copy my external USB flash drive onto internal flash drive:
 # Get into the Shell prompt after pressing "6"
 # My boot drive is da0, the internal flash drive is da1
 # First, make sure da1 is not mounted on /cf:
 freenas:~# umount /cf
 # Copy the data from external flash drive onto internal flash drive
 # (that will take a few minutes):
 freenas:~# dd if=/dev/da0 of=/dev/da1 bs=512
 dd: /dev/da1: end of device
 501761+0 records in
 501760+0 records out
 256901120 bytes transferred in 763.982 secs (336266 bytes/sec)
 # Shutdown:
 freenas:~# halt
The "end of device" error can be ignored here, this is because my external flash drive was larger than 256MB.If you get "dd: /dev/da1: Operation not permitted" error, that means your internal flash drive is mounted and you need to unmount it first ("umount /cf" command).
- After shutdown you can remove all your external flash drives and try to boot to your freshly installed FreeNAS.
FreeNAS is on! But there is one little issue only.. The network card is not recognized so we can see "lo0" interface only. So there are two choices here:
- The easiest: install PCI-express Network card into an empty slot (Intel chipset would be nice).
- Integrate Marvell Yukon driver into your existing FreeNAS installation.
I'm not going to describe method #1, it's easy enough to do it yourself. Just make sure you get a decent Gigabit card which is supported by FreeBSD/FreeNAS. I saw many based on Intel chipset for PCI-express on eBay for around $20-$30 or so.
The method #2 is more tricky when you are not familiar with FreeBSD so I'll try to explain it here in a few steps:
- Download if_myk.ko and libmbpool.ko files for your system (FreeBSD x86 or x64) and put it on an external DOS-formatted flash drive (if_myk.ko can be downloaded from Marvell website using the link provided below, libmbpool.ko is a part of FreeBSD 7 installation).
- Insert your flash drive into USB port (my FreeNAS recognized it as "da1" so I'll use it in my examples)
- Do the following to copy and install the driver:
 # Get into the Shell prompt after pressing "6"
 # Re-mount your internal flash drive to be read-write:
 freenas:~# umount /cf
 freenas:~# mount -o rw /cf
 # Create a mount point for your external flash drive and mount it:
 freenas:~# mkdir /tmp/flash
 freenas:~# mount_msdosfs /dev/da1s1 /tmp/flash
 freenas:~# cp /tmp/flash/if_myk.ko /cf/boot/kernel/
 freenas:~# cp /tmp/flash/libmbpool.ko /cf/boot/kernel/
 # Open loader.conf in editor:
 freenas:~# nano /cf/boot/loader.conf
 # ... and add the following line at the end:
 if_myk_load="YES"
 # Save, exit and reboot
 freenas:~# reboot
- After FreeNAS is rebooted, you can configure IP address for "myk0" interface by using option #2 of the Console menu.
The problem is that myk0 driver is getting non-responsive after a reboot so after searching I found it's an issue with checksumming on the card and it should be disabled. It's fully described here. I did the following steps to disable it in FreeNAS:
- Use Option #6 in the Console menu to get to the Shell
- Do the following command to disable checksumming on Marvell Yukon:
freenas:~# ifconfig myk0 -rxcsum
- Login to FreeNAS using your browser and IP address you assigned earlier
Go to "Network" -> "LAN" and add "-rxcsum" in "Extra options"
- Click "Save" and reboot to verify
After everything is working properly you can insert hard drives and start configuring your FreeNAS.
P.S.: Do not forget to change your default admin password just in case.
Known issues
I'm going to put all issues I found after FreeNAS installation on H340. If I find some fix for it, I'll add them here as well.
- The "i" LED is blinking. It does not bother me, but it can be disconnected as the easiest work-around.
- Shutdown does not turn off the power of the machine so I'll have to power it off after it.
External links
Build your own VGA cable or Buy the VGA cable or (more expensive) ATI FireMV 2250 256MB GDDR2 PCI Express x1
Parts which I ordered when was building the VGA cable:
- You will also need DB15 Female VGA connector and a cable (I used an existing VGA cable).
An alternative set of housing and terminators: